Showing posts with label peachtree. Show all posts

Tuesday, 14 May 2013

how to save purchase order


how to save purchase order .
First open the existing company from peach tree software then goto task menu and select the purchase order button as shown in the picture below.
After that you will receive a window of purchase order

Here in the above window you have to enter the information about purchase order
Vender ID
Date
Purchase order number PO num
Quantity
Item
Per unit price
In this account we will maintain the vender account and inventory item account as well
Fo vender ID you will make a vender account and then select the date. Then you have to enter purchase order no. quantity of item. For item you will maintain the inventory items. Then per unit price.


Vender account


Tuesday, 2 April 2013

maintain customers record


Maintain customers Record
To maintain customers record first open the Peachtree software and click then open you company and go to 3rd menu of Maintain click on the customers prospects button as shown in the Pic below

.  this includes information such as:
Name and address information, including separate billing and shipping information, e-mail address, and Web site address The customer's beginning balance.The preferred method of payment for this customer The date of the last invoice, statement, and payment received Sales history, including year-to-date and period-to-date sales and monthly totals  The usual sales account used for this customer    Terms of payment and the sales tax code   


After this process you can fill also sales default menu by clicking sales default button
As shown in the window.First you have to select sales from your account maintained. 
In which you can enter sales rep, GL sales account, pricing level which are different option available of pricing.
As shown in the picture below.


After that you have also an option of payments default for recording the credit customer options


As shown in the pic there is customer name address and its credit information their credit card number expire date and etc


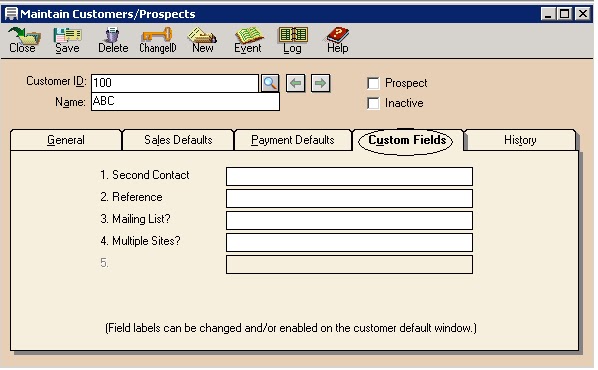
In the picture above there is an option of customer Fields this the window to enter the customer field and can change the option by filling the tabs you can change the option of feield to your required


In the window above you can also save the history of customers by date invoice


Customer Default Information

To providing the customers default information first of all go on maintain menu and select default information section as shown in the picture below

Now from default information menu select the customers button


After clicking on customers default you will get the menu of customers default
Default information for customers includes:
·         Standard customer payment terms
        General Ledger accounts for sales and discounts
·         Aging information for invoices due
·         Custom field labels
·         Finance charge rules and label
·         Customer payment methods
As shown in the picture below:


Payment terms menu:


G/L Link Accounts the defaults are used to link sales income and sales discount G/L accounts to most of your customers. You change individual customer setup, if necessary. G/L Sales Account: Enter or select the account ID you want to use as the default sales (income) account when entering customers. You must enter an account number here. Discount G/L Account: Enter the number of the account you want to use for discounts. You must enter an account number here.


Account Aging Choose either Invoice Date or Due Date. If you age by invoice date, this will show how old each customer invoice and balance is. If you age by Due Date, this will show how overdue each customer invoice is. Many people choose to age customers by Invoice Date and vendors by Due Date.


Custom fields let you set up and store that unique data. You use the custom fields to set up fields that aren't available in the Maintain Customers/Prospects window. For example, you can label customers by location (in-state, out-of-state, international). You would enter the label as Location. When you are entering a customer, you would enter his location under the Custom Fields tab.


Finance charges
Enter the balance amount over which the second interest rate will apply. On balances below this rate, the rate in the Annual Interest Rate field will apply. On balances over this amount, the second interest rate applies. This lets you offer different rates to customers depending on the balance their accounts carry.
It includes


                                           :(    :)
Thank You.

Wednesday, 20 March 2013

Maintain charts of accounts in Peachtree accounting


Maintain charts of accounts in Peachtree accounting
Open your company account from the path where you have saved the file. Then select the chart of account option by clicking ‘’maintain ‘’ menu and click on chat of account option


First of all we will decide why we maintain chart of account because we have chosen build your own company in the beginning so we have to maintain new chart of account such as (income, expense, equity, Assets, liabilities etc)
You will receive a chat accounts and which you have to record entries by giving title in it    


In the above window you have to give description, provide account ID, and select the Account Title. One after one. To maintain your chart of account of your own new build company and by entering every account ID and name etc have to click the save button after entering  every account


There are so many other options like if you have entered a wrong account you have also an option to delete that account.  In this first we have to search the relevant account from the chart of accounts
By clicking the search button as shown in the pic


By clicking on list of account button you will see the list of your chart of account


As you see in the above window you will select an account from the list.and press the delete button as in the window below


After clicking on delete button you will surely get this account deleted


Now to change the ID of en existing account first you have to select the account from the list and then click on the change ID button


After clicking on the change ID button you will get a new window open.

Here you have to provide the current Account ID and Enter new Account ID  and then press the OK button on the right top side
And the account ID will change


To enter The beginning balances of chart of accounts

Now after entering the chart of account in your new company you have to enter the beginning balances of your accounts first you have to click the beginning balances button showing on the right side of window


Click on  the beginning balances you will see a window of entering the date for beginning balance from where you have started

From this window you have to select last year 31 December  date of which you want to enter the balances like if it is 1stof January the starting date then you will have to select the 31 December  of last year like it is highlighted in the window below


After confirming the date of beginning balances click the OK button and you will the window in which ou have to enter the amounts of your chart of accounts


Now enter the value of each account and at the end click on the OK button showing on the top of the window
After entering all the balances of the chart of accounts your Assets, expenses should be equally to liabilities, Equity, and Income of the company as shown in the window below